I didn't get a true "before" shot (sorry). You can see the pine inside the shelves. That's what the whole cabinet looked like. Matthew sanded it and primed it for me. You can see the fronts of the drawers and the cabinet doors in the background are primed. In this picture, I have just covered the outside of the cabinet, including the feet, with a dark brown.
I left the drawers primed for a different color.
The drawers got a dark raisin color.
You can really see the pine inside in this shot. I opted to leave it, but you could also paint it the inside a contrasting color for visual interest.
I did two coats of dry brushing the dark brown. Not true "dry brushing," but I did dip the brush in paint, dab the brush on a towel, then do lighter strokes so it looked "streaky."
You can kind of see how I didn't paint it a "solid" color, leaving streaks.
This is actually two coats of the raisin color. You can see how this technique is basically painting really badly. :-)
After allowing each paint coat to dry, I used a cream color to dry brush over the brown and raisin. I left this coat VERY streaky so you can see there is a color underneath. I used the same technique as the brown: dip the brush in paint, dab on a towel, light strokes.
Now, this is the second coat of cream. I watered the paint down in a cup, dipped the brush, really dabbed it off well on a towel, and did a true "dry brushing." It gives it a a whitewash effect. Just play with it until you like it. You can use a towel to wipe off parts you think are too thick or that need more streaking. Just play with it. Like I said, this is truly just painting badly. It will look a little bit like you let the neighbor kids paint while you weren't looking.
Let everything dry for a few days. I waited a week. You want all of the under layers to be perfectly dry. I used acrylic paint, but chalk paint is even better, since it sands like a dream. But I always feel like I won if I get something very inexpensively, and chalk paint is EXPENSIVE. I will be trying making my own in the future, though. I'll let you know how that goes.
Anyway, here is where I started sanding. Sand as lightly or as aggressively as you like. Hit the raised areas that would normally get hit or rubbed against something and wear off. Then just have fun with it. I used 220- and 180-grit sandpaper. It did take me a while to get it the way I like it. I wanted to sand down to see the brown, the raisin, and all the way down to wood in some places.
The sanding is all done and it's getting wiped down and ready for stain. Yep, I said stain.
A detailed shot of the top after sanding.
The side after sanding.
A closeup of sanding down to the brown.
Detailed side after sanding.
Since I wanted this to have a "tea stained" look, I used a coat of light oak stain all over. It sits on the paint a little weird, but I did an area, let it sit for 5 mins or so to allow it to get tacky, then really lightly went over it with a clean cloth. I waited a day and then put ANOTHER coat of light oak stain on it, paying attention to the edges and corners and also the places I had sanded down to wood.
In the picture below, you can see the difference between the door, which has no stain yet, and the drawers, which do.
Since I plan on using this cabinet quite a lot, I had to polyurethane it. Because some guy on a YouTube video recommended it, I got a polyurethane that also had a tint in it. I will probably not do that again just because of the consistency, which was like water and really hard to use, but after I started using a sponge brush instead, it worked better. I used two coats of poly, letting it dry really well in between coats.
Thankfully, I liked the old hardware, but we did spray it with a matte clear to take the shine off of the drawer pulls.
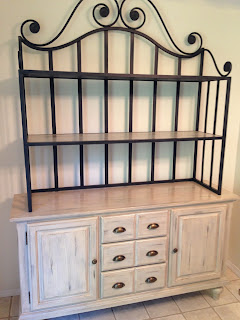
After putting the baker's rack back on.
And adding the shelves (which also got the same treatment as the cabinet - I just didn't take pics.)
Tight shot of the cabinet.
After allowing it to cure for several days, here is my finished product! I'm really happy with it, especially since I basically have a new piece of furniture for free.


No comments:
Post a Comment